No products
Top sellers
-

Dried Bhut Jolokia Chocolate
[850,000 SHU] Chocolate version of the organic dried Bhut Jolokia....
0,99 € -

Dried Habanero chocolate
[250,000 SHU] The organic version of the dried "Black Congo". It is...
0,99 € -

Black Panther Orange seeds
[1.000.000 SHU] [Hybrid F4] Black Panther Orange is a novelty of...
4,99 € -

Dried Habanero White Bullet
[250,000 SHU] Habanero White Bullet are ready to be launched into your...
0,99 € -

Dried Habanero White Giant
[250,000 SHU] It is sweet and uncommon this chilli pepper, it was born...
0,99 € -

Dried Pimenta da Neyde White
[200,000 SHU] [F2 hybrid] White and hybrid version of the Pimenta da...
0,99 € -

Dried Habanero Mustard
[250,000 SHU] Habanero Mustard is like a lanter that light your dishes...
0,99 € -

Dried Habanero Yellow
[250,000 SHU] Habanero Yellow will light you with your bright colous,...
0,99 € -

-

Dried Carolina Reaper Chocolate
[2,000,000 SHU] [F3 hybrid] Chocolate color version of the dried...
0,99 €
Categories
ALL YOU NEED TO KNOW ABOUT GROWING CHILLIES
INDEX:
- Sowing
- Germination
- How to remove the muld
- What is and how to remove the helmet head from cotyledons
- The structure of the chili pepper seed
- How to remove the helmet head (video tutorial)
- The soil
- Transplanting the chili pepper plant
- Plant growth
- Fertilizers
- Fighting off parasites
- Extracting and conservation of chili pepper seeds
- Video tutorial
Sowing:
Sowing is the first procedure to be carried out when you want to cultivate anything. The most important things to check to make everything the right way are: temperature and humidity.
First of all, it is necessary to evaluate well the place where to store our seeds because the temperature must not fall below the 15# otherwise the seeds will not germinate. Moreover, the choice of the sowing period is crucial. Pepper seeds are usually planted in February/May to allow the plant to grow in harmony with the seasonal rhythms.
Another option that requires very little time and can give excellent results is: the germbox (how to build a germbox). With this method, the plant is guaranteed a stable and controlled temperature and environment in order to avoid any damage caused by the change of season.
Warning: to make the seeds sprout you have to germinate with this method easy and suitable especially for inexperienced! the scottex germination method. Fill the glasses with scottex and water because for germination it is important and necessary to keep the seeds in a warm and humid condition. So if you’re a novice, AVOID DRYING SEEDS AND let the water evaporate slowly.
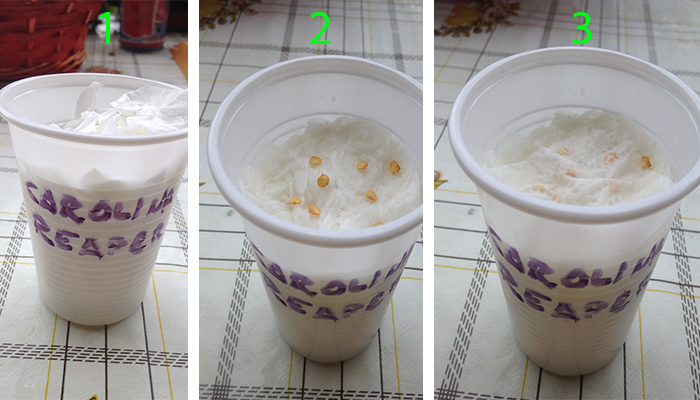
That’s what we mean when we talk about optimal germination and also suitable for beginners!
To carry out this process:
1) use BIG size plastic cups
2) insert the toilet paper inside and press with your fingers to compact it
3) pour water to make the environment humid
4) write the name of the variety with an indelible marker on the glass
5) place the seeds on the toilet paper and cover them with a layer of water-soaked scottex
FAQ:
What is the reason for using toilet paper and scottex?
The toilet paper is soft and therefore allows the root to sprout and not find resistance and is also very suitable to transfer the buds without damaging them.
The scottex is better suited to cover the seed because it absorbs more water and holds it better to ensure the necessary humidity.
Do you have to put so much paper on the bottom of the glass?
Yes, because the more wet paper we put in, the more moist our germination environment will remain. Otherwise, the lack of water may prevent the seeds from germinating.
Germination:
To grow roots we will have to wait about fifteen days.
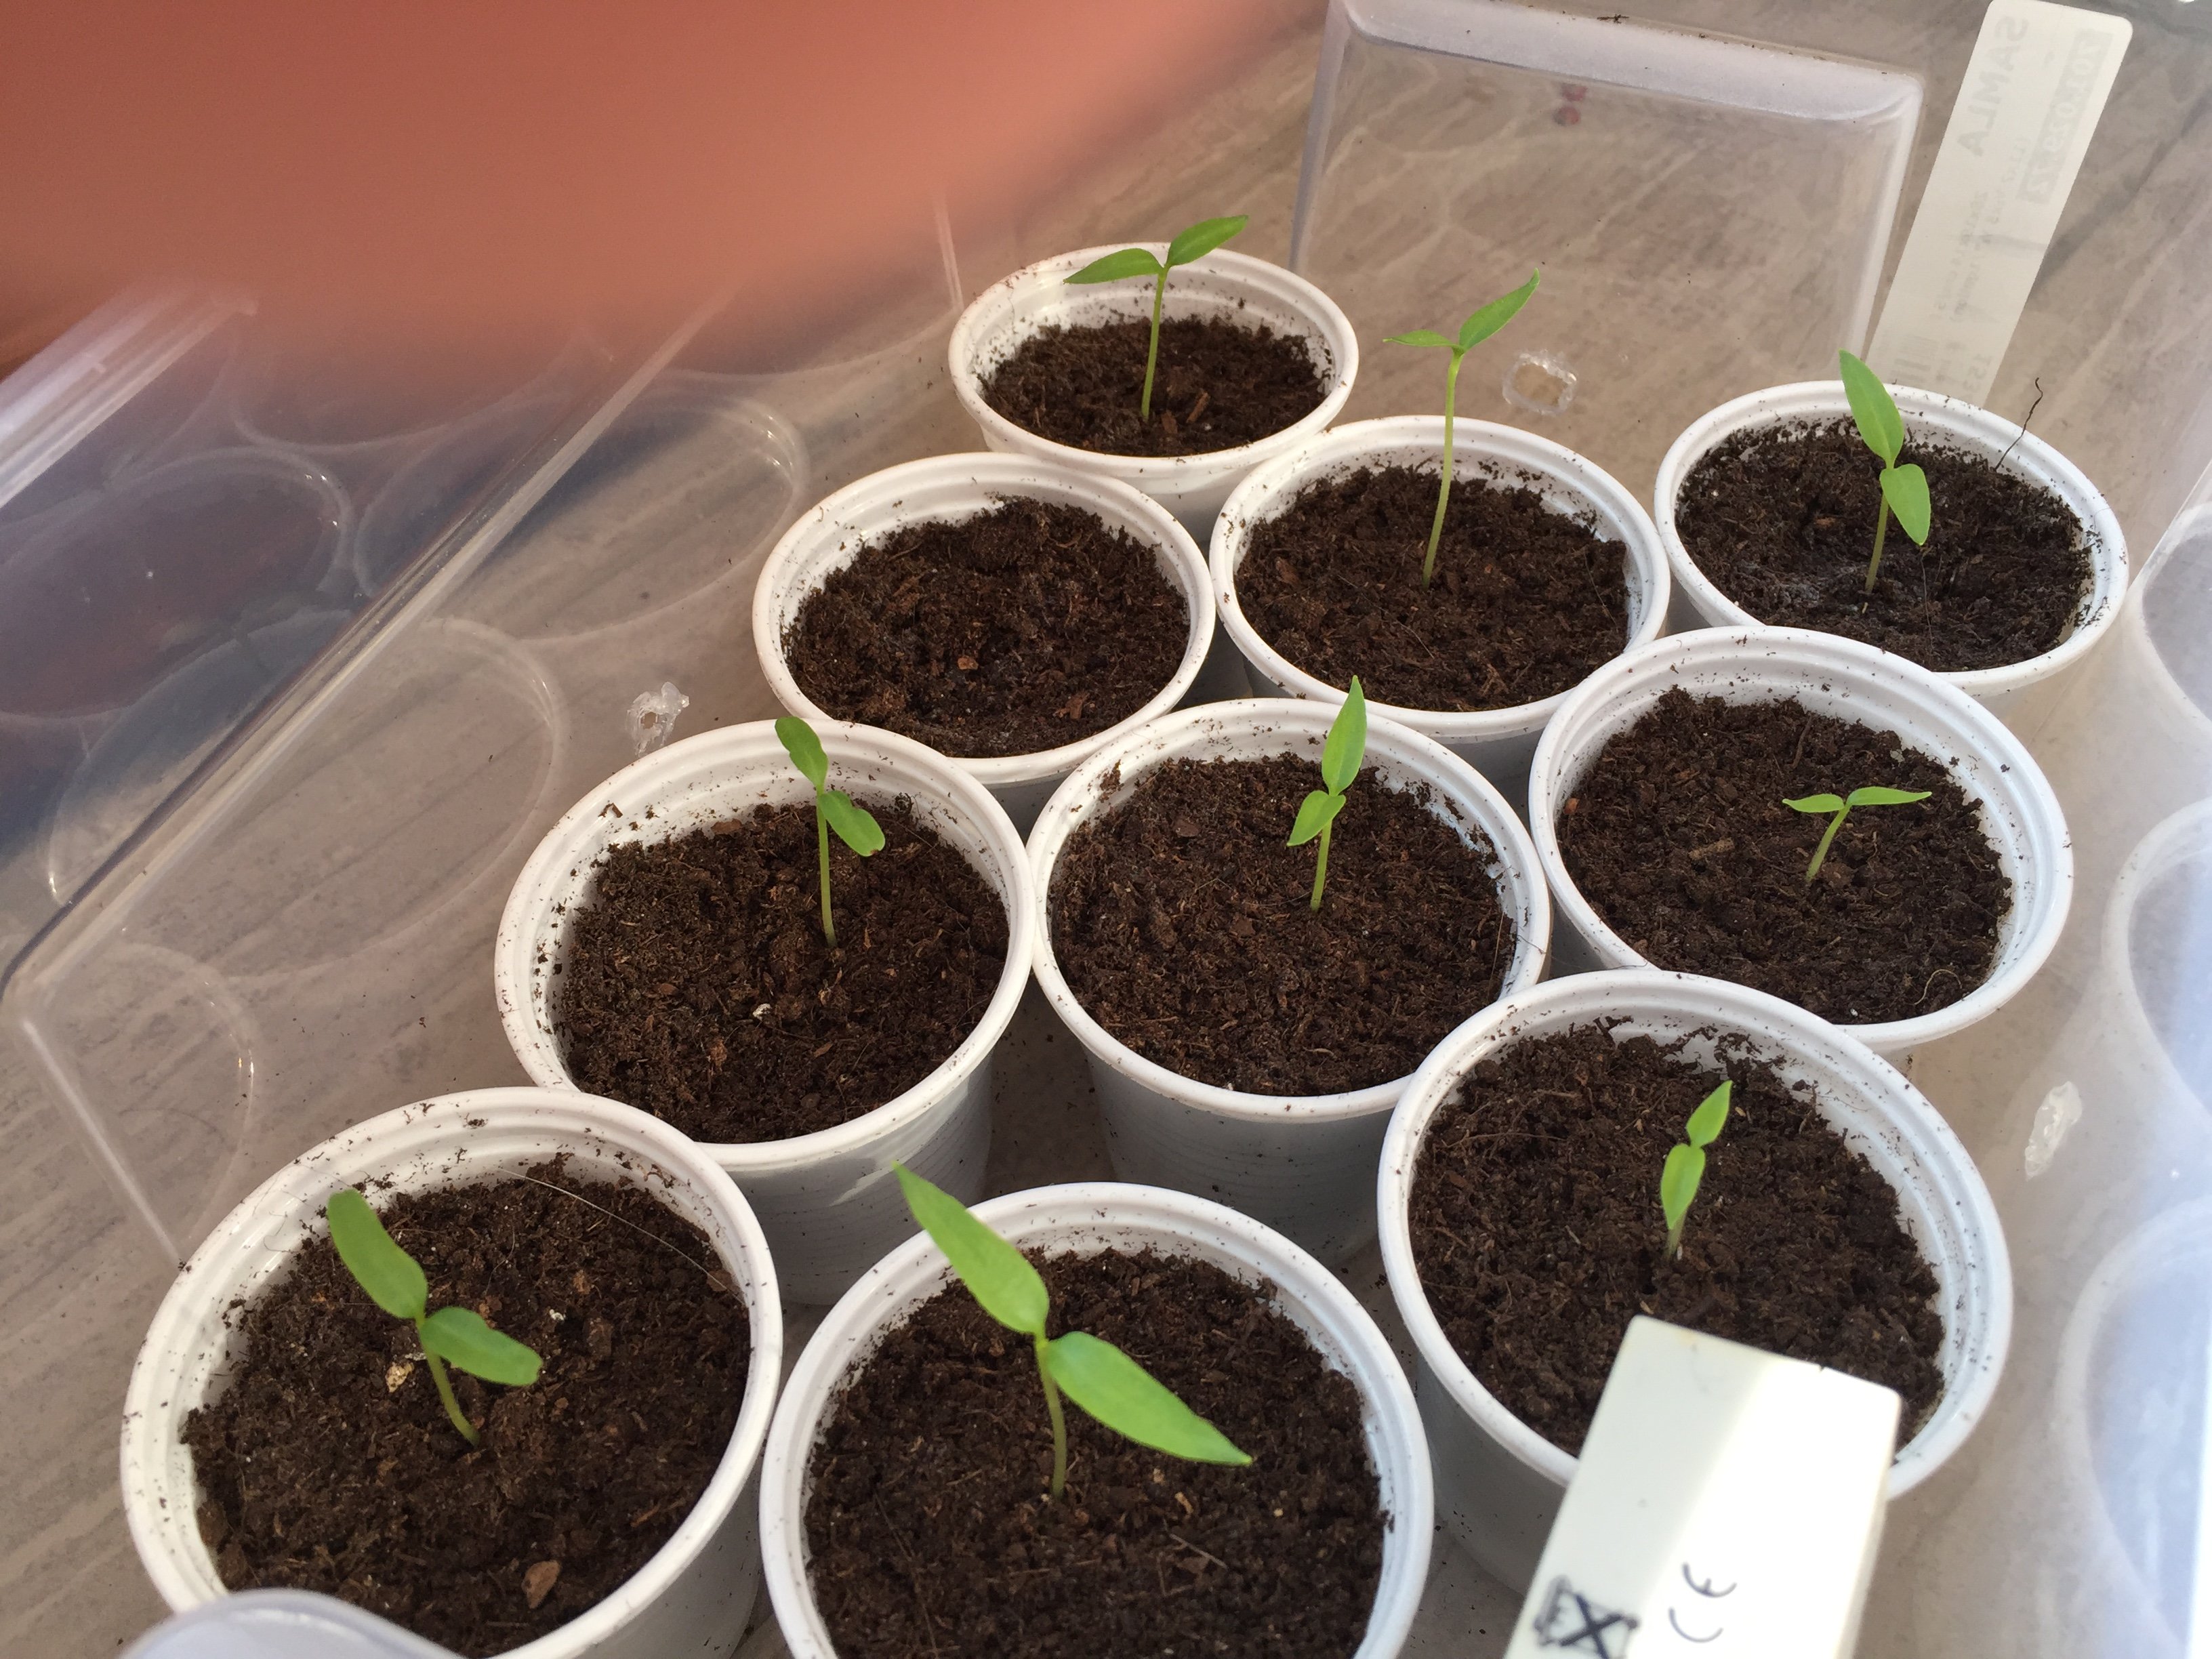
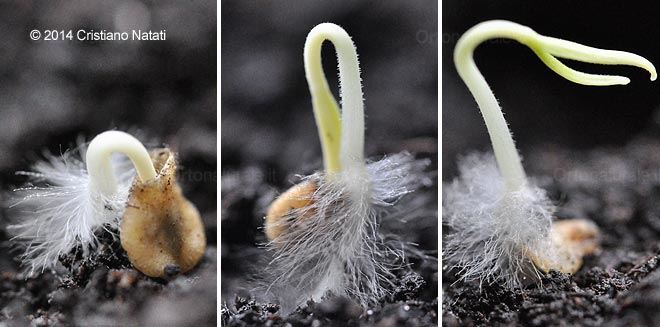
When the sprout will be sprouted and you will see the small plant come out of the seed, as in the picture below, we can take it gently and transfer it into the pot with the earth.
(Don’t worry about the white hairs you see in the picture and that you can see in your buds, they are just radical extensions!).
How to remove the mold:
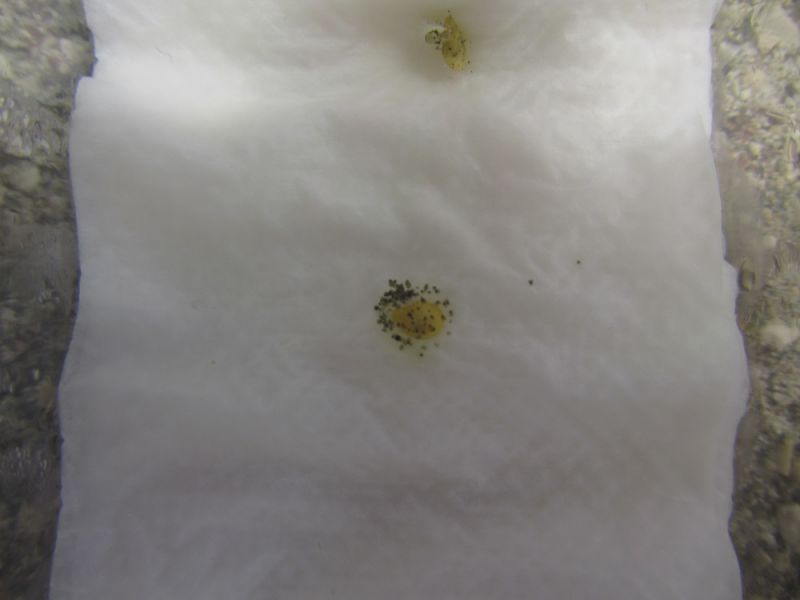
Mold is a problem that can be solved very easily. As you can see, the mold is clearly visible as a series of dots aggregated together in a precise area.
Chamomile is perfect for cleaning the seed from the mold. Rub the chamomile soaked absorbent paper and the mold will disappear from your seed.
Also, if you want to take precautions you must wash your seeds with chamomile before sowing them. Remember to dry them gently and without damaging them.
What is and how to remove helmet head from cotyledons:
Sometimes it may happen that a seed does not open completely and that the cotyledons, that is the two leaflets that form at the beginning, remain imprisoned inside the seed.
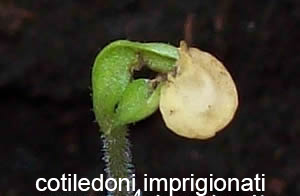
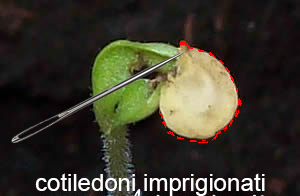
To soften the shell just always use damp paper towels and place it over the shell so it softens. It usually only takes one night.
After that, you must be very careful when removing the shell because the cotyledons could tear off. Then follow the line, as in the picture, and try to split the shell without forcing.
The structure of the chili pepper seed
Inside the seed there are three fundamental elements for the growth of a healthy plant.
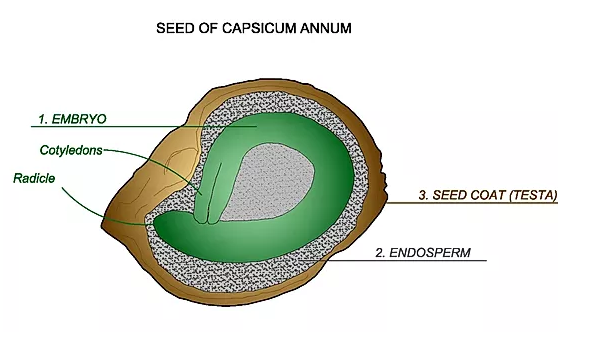
- Embryo (embryo): in other words, the fertilised ovum, consisting of two cotyledons and the root system;
- Endosperm (endosperm): these are the nutrients to develop the seed in the germination phase;
- Casing (head): the seal, the protection of the embryo from the outside.
How do we remove the helmet head
Let's have a look on that video tutorial:
The soil:
Potassium and phosphorus are the daily bread of our chillies. Buy a soil that is rich in these nutrients and low in nitrogen in order to grow strong and healthy plants! In addition, the water must drain because there must be no stagnations so you have to add clay at the bottom of the pot to avoid mold formation. For more information we have created a guide: preparation of the soil for chillies.
Transplanting the chili pepper plant:
To transport the buds from the plastic cups to the pot you have to be very careful, but above all you have to choose an excellent soil and place the pot in a sunny position. Remember to wait until the plant is at least ten centimeters high and then put it under the full sun.
An example of a transplant performed:
Video:
The second transplant occurs when the plant is a little less fragile, has grown and needs a larger pot that will have to be placed in a place where it is exposed to alone throughout the day, because chili peppers are plants that need sun to develop both in the vegetative phase and in bloom.
(There are really endless varieties of chilli, natural or hybrids, from all over the world, we have practically all: chilli seeds)
Plant growth
The important thing is to pay attention to the hours of light, which must be many.
Water, which must be supplied in a moderate way and only when the soil is dry, to avoid stagnations and mold. Water the plant only in the evening, to prevent wet leaves from burning in the sun during the day.
There may be a need to create a support to the plants because they could bend given the growth, it is in fact always an excellent remedy to prevent it from breaking due to the weight.
Fertilizers:
It is absolutely not necessary to use fertilizers to grow chili, as long as the soil is rich in nutrients. Depending on the richness of the soil the plant will increase its growth, size and number of fruits.
The advice we give you is to use a special soil with organic fertilizers that are designed to feed the plant properly throughout the development period. The benefits of using fertilizer are considerable: the size of the plant will be larger and the fruits much more abundant. The choice is yours!
We have selected some articles just for you:
- Preparation of soil for chilli plants
- Fertilisers for the growth of chilli
- Fertilisers for the flowering of chilli
Fighting off parasites:
The most common parasite for chillies are aphids. A natural remedy are ladybugs that feed on these parasites, for example you could grow other plants that are prone to attract them such as veronica, dandelion, fennel and carrot. Another remedy is the ordinary Marseille soap, which has a fragrance that should eliminate them; just spray the plants (at least ten centimeters high) with a solution made of water (10 liters) and soap.
If you need more information about diseases or parasites, click here: All diseases and parasites that attack the chillies.
Extraction and conservation of seeds
Be careful not to touch seeds and fruit placenta without putting latex gloves on!! To extract and preserve the seeds you have to open the fruit with a knife and gently extract the seeds. Then put them in a place with no moisture and no light. Also, to make sure that the chillies dry you have to bake them at seventy degrees for about forty minutes, in this way the water will evaporate and you will avoid the formation of mold. Then leave them in the sun for a few days.
If you want to know more about how to preserve the seeds: Collection and conservation of chili seeds.
If you like indoor cultivation (inside): guide to indoor cultivation
Video tutorial:
Since there are many videos for the cultivation guide, we have made a selection of tutorials that will help you throughout the journey, from sowing to drying!


